 Dark Ages Re-Creation Company


On May 4-6, 2001 members of DARC gathered to take a workshop on the Warp Weighted Loom with Danette Pratt.
Seven months later, Neil built me a loom during the Christmas break to start weaving on. Five months later, I actually warped up my first project. Time flies when you procrastinate.
I choose to start with a tabby pattern in the weave because it is the simplest of all patterns. Two sheds create a very simple back and forth in the weave. If X is over the warp and O is under, it looks like this:
XOXOXOXOXOXOXOXOXOXOXO
OXOXOXOXOXOXOXOXOXOXOX
I used Patons' Classic Wool Merino, because it was cheap and available in bulk at Len's Mill Store in Kitchener. I chose contrasting colours in off-white and blue for the warp and weft, because I wanted to be able to see the weave very clearly. I've since learned that contrasting colours in this manner isn't at all period to the Norse.
Neil and I cut 225 threads to 25 feet each, using 9 balls of the off-white wool . Our process for repetitve measurement seemed simple enough at first. Throw the ball of yarn to each other across the kitchen into the living room to a space measured out to about 25 feet. This created a few tangling and tension problems. Tension in the yarn...and in me, as I tried and failed to untangle the resulting mess. Neil is the one with patience and he seperated out the mess and handed me the individual warp.
Next, I started folding them evenly over the header rod to form a loop, so each side of the thread would end up just over 12 feet each. I stopped at 140 threads tied on because I thought that looked 'wide enough' for a beginner project.
I used a thin hemp rope for the heddles. Cutting and tying them on took.....forever, even with Neil's help. First I tied the rope around a 2"x4" to make a consistent loop and then we tied them on the 2"x2" heddle rod.
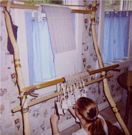
Each of what was to become the back side of the shed was then fed through the heddles (after calling Bera to figure out which warp got put in the heddles and which didn't - some things didn't just 'click' with me easily). Warp was weighted in bundles of 20 each, so there were 7 weights on each side of the bottom beam of the loom.
For weights, I started by using coin tied in bundles of cloth and weighted on a kitchen scale at 12 oz.. These bundles were tied to the warp with more of the hemp rope. Later in the project, I had to move the weaving to a new loom, that was vaguely more authentic looking for the demonstration at the CMC. I took the opportunity to change the weights at this point as well. I sewed up some rough linen bags and used small stones. I lightened the weights to 10 oz. at this point as well, and tied the bags to the warp with leather thong. I can't remember the reasoning behind lightening the weights.
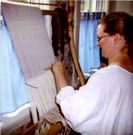
Finally, we were in business and the weaving began!
When the heddle rod is pulled forward, the warp attached to the heddles is pulled forward through the warp weighted and hanging at rest on the front of the bottom beam of the loom. This creates an opening (called a 'shed') through which the weft is moved (sometimes called 'throwing the weft'). When the heddle rod is placed at rest against the loom, the warp in the heddles returns to it's natural position weighted behind the bottom beam of the loom and behind the warp that is weighted in front of that beam. This creates the second shed through which the weft is then thrown. In a tabby, this pattern simply repeats itself over and over again until the project is done.
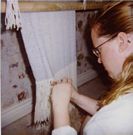
Weaving goes like this: open the shed (curse and swear silently when it's being difficult), beat the previous weft more tightly into place with the sword beater, throw the weft through loosely, comb it upwards into place, change sheds and do it all over again. It's important to not pull the weft too tightly because this will create a 'drawing in' of the sides, diminishing the width of the project.
 |
 |
||
| Combing the just thrown weft upwards | Beating the shed open, packing the weft from the previous shed tighter |
Draw-in is a very common problem in weaving on all kinds of looms, and is most frequently found at the beginning of a project. Over the course of my project, I lost about 3 inches to this problem.
I had a great deal of trouble with sticky warp, where I found the warp threads difficult to move apart from each other in order to change the sheds. I believe there was several factors here creating this problem. The wool felted a fair bit at the heddles, catching on the hemp heddles and it's neighbouring warp. This was sometimes made worse by humidity, depending on the time of year. I discovered over the course of the year that I spent doing this project that this problem eased up, because the wool seemed to shed all of it's excess felt without actually disintegrating and breaking, and as I weave more and faster, it had less time to rub against the heddles. I guess I also just discovered more ways to seperate the sheds easier and quicker so it didn't impede me quite so much.
I've since learned that a process called 'sizing' might have eased the problems with sticky warp. Sizing is the process of soaking the warp in a flax seed mixture to coat it. This is still academic knowledge, as I haven't yet warped up a new project and wasn't about to try sizing the first one in mid-progress.
This project got moved around a great deal over the course of it's lifetime. I took the loom to a few demos and at least one SCA camping trip, and at one point, the project changed loom frames entirely, even being cut off it's original header bar and being sewn onto a new one. Surprisingly, this didn't seriously affect the quality of the weave at all!
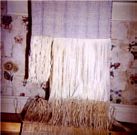
The final piece ended up at 9 feet, 4 inches long. It was 17.5 inches wide in the beginning and tapered quickly to 14 inches, where it stayed throughout the project. We used only 1.5 balls of blue weft throughout the entire project. I ended up with fringe at both ends (like a scarf). I haven't the foggiest how the Viking women would have finished a weaving to create a selvage edge. I might have gotten another inch or so, but as the end grew near, I grew itchy to see it done.
 | As the project got close to the end, I moved the bottom bar up quite close to the heddles to keep the sheds opening when I reached the end of being able to move the weights down the warp (because there was no more warp to extend). Theoretically, I could have kept weaving until the fabric came much closer to the heddle rod. But at some point, I decided that was enough and ended it. |
 |
 | First, I lowered the header rod to the heddle supports at mid-frame. This took the tension off of the warp. Then I cut the remaining warp and tied each warp thread to create a fringe. Viking women probably would have used the remaining fragments of warp to naal-bind with. I tried that for a bit, but got annoyed and ended up tossing the remains. Bad environmentalism, bad re-enactor. I know. |
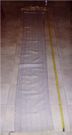 |
This is a picture of the finished project, laid out on the floor. The picture
didn't turn out that well, but it measures 9 feet, 4 inches in length. I've just started a new project in a 2/2 twill. More on that in the next report. |