 Dark Ages Re-Creation Company


It all started a long time ago, in a place far far away. Karen took a workshop with others in the DARC community on learning how to weave on a warp-weighted loom. The workshop was led by Danette Pratt on May 4-6, 2001 in Dundalk, Ontario.
Almost a year later during the Christmas break at the end of the year, Neil built Karen a loom to start weaving on.
Purpose of original loom:
To get something quick and dirty together to allow for weaving to start
and to get Karen to stop bugging Neil. The design allowed for easy
adjustment of height/width of various bits and was very inexpensive.
Perfect for a loom that was expected to require significant fine tuning
before a more serious loom was built.
Shopping list
1 @ 1" x 4" x 8'
2 @ 2" x 4" x 8'
1 @ 2" x 3" x 8'
1 @ 2" x 2" x 8'
4 @ U-hooks with screw ends
8 @ 3/8" x 3" carriage bolts with washers and nuts
4 @ 3" wood screws
Also needed: A drill with 3/8" drill bit
Total cost: $20 or so
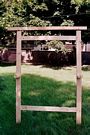
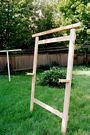
Construction:
1. Cut the 1x4 into 2 pieces each approx. 4' long
2. Cut the 2x3 and 2x2 down to 5'
3. Cut both 2x4s to 72"
4. Cut scrap 2x4 to produce 2 pieces 6" long
5. Screw U hooks into wood (one in each of the 6", and 72" 2x4s)
- the ends of the long 2x4s with the hooks are the TOP
6. Measure up the long 2x4 and mark at 14", 38", 67"
7. Drill 4 holes in each long 2x4 (two at 14" and two at 67")
8. Place each 1x4 across the 2x4s and drill matching holes
9. Using the bolts secure the 2x4s and 1x4s together
10. Mount the 6" blocks of 2x4 onto the uprights at the 38" mark using the screws
11. Lean the unit up against the wall
12. Put the 2x3 across the top as the header
13. Put the 2x2 across the 6" blocks as the heddle rod.
14. Spend forever tying heddles and warping the loom.....
 |
 |
 |
|
| Straight on | Side view | Heddles |
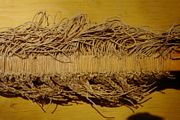
This ended Neil's part so, having no more excuses,
Karen warped it up and started having fun. You can look in on
her project here.
As was mentioned above one of the purposes of this loom was to allow
some adjustments to the various emasurements.
Before the second loom was build it was decided to lower the header by
4", raise the bottom brace by 4" and move the top brace higher and
further back from the uprights. You may decide to make these changes on
the simple loom or simply make it full size and decide your own
preferences.
Loom #2:
The Design:
This was intended to be a more visibly period loom. The idea was to use
some hard maple branches that had been drying for 8 months to produce a
"natural" look and use shapes in the wood to produce the shaped pieces
to hold the header, the heddle rod supports. We also wanted to use
branches for the cross beams, header rod and heddle rod. The result was
not exactly what had been hoped for -- Neil thinks it looks like it was
made by a drunken apprentice woodworker.
The construction:
Once the various bits were gathered and had spent some time drying they
were cut to length and the bark stripped using a grinder. Ok sure I
also spent some time with an axe stripping bark but I was under a
deadline and the axe work needed rest time between sessions to let my
arm muscles stop screaming.
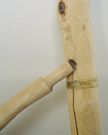
3/4" holes were then drilled for a bottom brace, heddle support rods,
and peg braces out the back. The heddle support rod holes I angled a
little more to provide a more stable pocket for the heddle. After the
fact I don't think this was necessary. The heddle support branches were
stripped down at the ends and reduced by knife to 3/4" dowels. This was
actually rather fun and bluntly was the best performing of all the
other work I did on this loom.
A 4' branch (mostly straight) was then stripped down (axe work) and the
ends reduced to 3/4". This was smoothed by knife and a bit of sanding
so the wool wouldn't catch. Holes were then drilled in the uprights and
this branch placed in. The holes were then adjusted so the loom was
somewhat more straight. I'm sure a real wood worker would have done a
better job here but this was my biggest complaint with the process.
Using "natural" wood required too much fiddle work. Additionally as
time passed the ends of the branch were sanded down a couple of times
as they swelled due to humidity.
It was around here we noticed that from each hole in the uprights
splits were forming. I had hoped to avoid these through the drying but
it simply didn't work. We re-inforced above and below each hole with
bands of sinew sealed with hide glue.
By this point time was running out (we wanted this loom for the CMC Demonstration). Instead of cutting down another branch for a header, and a third for the top support I cheated and bought hardwood dowel. 3/8 for the support and 1.5" for the header. Hey the norse did have lathes after all.
The 3/8 dowel runs through two holes in the rear fork of the
uprights above the header (and thus out of the way). The 1.5" dowel
received some small holes every inch along its length to "lock" the
warp so it wouldn't just roll. A larger hole was added to one end for a
"pin" that is tied onto the one upright to prevent the header from
rolling. We then cut the current project off the 2x3 header and re-tied
it onto the dowel.
 |
 |
 |
 |
| Loom in action | Loom in action | Lower brace join | Top fork |
Loom #3
This was another "quickie" with a specific purpose. Like the first loom
this one is made of modern materials. It is intended to be a "half
scale" loom so that Karen can play with materials and weaves before
warping up a full sized loom. Take a 2x4 and cut it in half for the
sides. Use some 28" scraps of 1x2 I had lying around to make the upper
and lower braces. The usual modern "U" hooks to hold the header rod.
Some 3/4" dowels with more "U" hooks made decent heddle supports. No
picture of that loom yet.
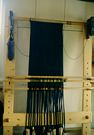
Loom #4
This appears to be the "final" loom as I don't think it has changed in
any way in 3 years. I had this one done up by a professional
woodworker down the way. The uprights are 2x6 shaved down
slightly in width and surface dressed by hand so it isn't so obviously modern dimensional lumber.
There are a long collection of 3/4" holes drilled up each
side to allow the lower brace, and the heddle supports to move as
needed.
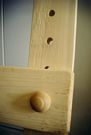
The lower brace is also a 2x6. It is notched where
it overlaps the uprights. Lathe turned pegs hold it in
position. These pegs are slotted on the back and have a wedge
to lock them in place.
There is no upper brace.
The header beam is a 1.5" hardwood dowel. The heddle rods are
1" dowels.
Karen uses two small pieces of stick that I had
whittled to have 3/4" "peg" ends. You see one of them in the
third picture with a heddle rod resting on it. The Heddle Rod
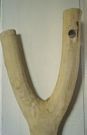
support are the branches I trimmed down for loom #2 (again easily seen
in picture 3). The top beam rests on two notch branches.
These have been shaved flat on one side and have two dowels
that support them on the uprights. Our really smart
woodworker even set the dowels at visibly different distances so that
it is easy to know which one goes where.
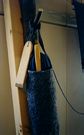
The final picture shows the weaving tools hanging from a small branch
on one of the header supports. A small warp comb, a
nallbinded bag holding the shuttle. The weaving sword also
hangs in that location. More detailed information about the
weaving tools are available here.
 |
 |
 |
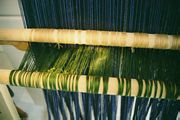 |
| Loom with twill | Bottom bar | Heddle rods | Heddles |
 |
|||
| Tools |